2019年6月30日日曜日

kubernetes クラスタの作成方法

1)GCPでkubenetesを行う最初の手順になる。


gcloud container clusters create [クラスタ名] --num-nodes=[ノードの数]

例) 
gcloud container clusters create test-disk --num-nodes=2


以降、マニュフェスト(xxx.yaml)の実行を行うことになる。

ロードバンサー検証 for k8s(Raspberry pi)

1)nextcloudのサービスの設定をロードバランサにしてみる。
============================
apiVersion: v1
kind: Service
metadata:
  name: nc
spec:
  type: LoadBalancer
#  type: NodePort
  ports:
    - name: http
      port: 80
      targetPort: 80
      protocol: TCP
  selector:
    app: nc
===========================


2)変更後、サービスを確認してみると。。。EXTERNAL-IPがpendingになっている。
ちゃんと、橋渡しをしてないのかな。
root@rasp-master:/home/pi/k8s/docker-nextcloud# kubectl get svc
================================================================================
NAME              TYPE           CLUSTER-IP       EXTERNAL-IP   PORT(S)           AGE
db                ClusterIP      10.102.201.116   <none>        3306/TCP          18h
kubernetes        ClusterIP      10.96.0.1        <none>        443/TCP           17d
nc                LoadBalancer   10.102.122.69    <pending>     80:30869/TCP      18h
wordpress         NodePort       10.108.179.243   <none>        31002:31002/TCP   8d
wordpress-mysql   ClusterIP      None             <none>        3306/TCP          8d
================================================================================


3)念の為、CLUSTER-IPから接続確認をしてみる。
root@rasp-master:/home/pi/k8s/docker-nextcloud# curl 10.102.122.69 
================================================================================
<!DOCTYPE html>
<html class="ng-csp" data-placeholder-focus="false" lang="en" data-locale="en" >
<head
 data-requesttoken="EUFCe5s6eXvP4h9Ls0jeHoL0HdUNsjZgXS+r6mHYgUg=:fiwuCshoKyK5kHJ54TGwMcu2KI1Ai3U1O0X+ggKs2Qw=">
<meta charset="utf-8">
<title>
Nextcloud </title>
<meta http-equiv="X-UA-Compatible" content="IE=edge">
<meta name="viewport" content="width=device-width, initial-scale=1.0, minimum-scale=1.0">
<meta name="apple-itunes-app" content="app-id=1125420102">
<meta name="theme-color" content="#0082c9">
<link rel="icon" href="/core/img/favicon.ico">
<link rel="apple-touch-icon-precomposed" href="/core/img/favicon-touch.png">
<link rel="mask-icon" sizes="any" href="/core/img/favicon-mask.svg" color="#0082c9">
<link rel="manifest" href="/core/img/manifest.json">
<link rel="stylesheet" href="/core/css/guest.css?v=118b5cb2-0">


                                        <  省略   >    

=================================================================================


<結果>
上記のことから、内部IPからアクセスは可能なようだ。
EXTERNALに接続するのは、別途、検討が必要みたいだ。

コンテナ:カーネルチューニング(マニュフェストの書き方:メモ)

以下のような感じで、マニュフェストに記述するようだ。

==============================
apiVersion: v1
kind: pod
metadata:
     name: sample-sysctl
spec:
    securityContext:
        sysctls:
        - name: net.core.comaxconn
          value: "123456"
     containers:
         - name: centos-container
           image: centos:7
           command: ["/bin/sleep", "3600"] 
=================================

2019年6月29日土曜日

Kubernetes用語まとめ

[Kubernetes Master 􏰀役割􏰁]
API Server / Scheduler / Replication Controller


[各 NodePod を実行する役割]
PodKubernetes 􏰀デプロイ単位で、1又は、複数􏰀コンテナを含む
LabelKubernetes 􏰀オブジェクト間を紐付ける役割
SelectorKubernetes 􏰀オブジェクトをフィルターする役割
DeploymentPod 􏰀可用性を担保する役割
ServicePod を内部、又􏰁は、外部に公開する役割
Service Discovery 􏰁サービスを環境変数やDNSで解決する役割
ConfigMap/Secret設定(コンフィグ)やパスワードをイメージから切り離す機能

ConfigMap

ConfigMapは、コンフィグファイルに値するものになる。

1)nextcloud導入後に、アクセス拒否をされたので
コンフィグファイルの編集を行う。

2)nextcloudが導入されているWorker(node)に直接ログインを行う。


3)ログイン後、早速、コンフィグファイルの修正を行う。
root@rasp-node2:/home/pi/nc-pv/config# vi config.php

=========================================================
<?php
$CONFIG = array (
  'htaccess.RewriteBase' => '/',
  'memcache.local' => '\\OC\\Memcache\\APCu',
  'apps_paths' =>
  array (
    0 =>
    array (
      'path' => '/var/www/html/apps',
      'url' => '/apps',
      'writable' => false,
    ),
    1 =>
    array (
      'path' => '/var/www/html/custom_apps',
      'url' => '/custom_apps',
      'writable' => true,
    ),
  ),
  'passwordsalt' => '**************************:',
  'secret' => '**************************',
  'trusted_domains' =>
  array (
    0 => 'localhost',
    1 => '192.168.13.4',
    2 => '192.168.13.5',
  ),
  'datadirectory' => '/var/www/html/data',
  'dbtype' => 'mysql',
  'version' => '16.0.1.1',
  'overwrite.cli.url' => 'http://localhost',
  'dbname' => 'nextcloud',
  'dbhost' => 'db',
  'dbport' => '',
  'dbtableprefix' => '',
  'dbuser' => 'nextcloud',
  'dbpassword' => '*********',
  'installed' => true,
  'instanceid' => 'ocgjay6usgx0',
============================================================


[結論]
と言うことで、podを編集しなくても、worker経由で直接編集も可能ということが分かる

2019年6月24日月曜日

openfaas メモ

root@rasp-master:/home/pi/k8s/faas-netes# faas-cli new --lang python-armhf http-ping
============================================================================
2019/06/24 10:56:21 No templates found in current directory.
2019/06/24 10:56:21 Attempting to expand templates from https://github.com/openfaas/templates.git
2019/06/24 10:56:25 Fetched 16 template(s) : [csharp csharp-armhf dockerfile dockerfile-armhf go go-armhf java8 node node-arm64 node-armhf php7 python python-armhf python3 python3-armhf ruby] from https://github.com/openfaas/templates.git
Folder: http-ping created.
  ___                   _____           ____
 / _ \ _ __   ___ _ __ |  ___|_ _  __ _/ ___|
| | | | '_ \ / _ \ '_ \| |_ / _` |/ _` \___ \
| |_| | |_) |  __/ | | |  _| (_| | (_| |___) |
 \___/| .__/ \___|_| |_|_|  \__,_|\__,_|____/
      |_|


Function created in folder: http-ping

Stack file written: http-ping.yml
===========================================================================

Openfaas for Raspberry pi

openfaasの導入方法について記載する。
オンプレでserverless体験をしてみたいので導入を行ってみる。


1)以下の方法で導入を行う。
git clone https://github.com/openfaas/faas-netes
cd faas-netes
kubectl apply -f ./namespaces.yml && kubectl apply -f ./yaml_armhf


2)実際に、導入が出来たのか確認を行う。
root@rasp-master:/home/pi/k8s/faas-netes#  kubectl -n openfaas get pod
======================================================================
NAME                           READY   STATUS    RESTARTS   AGE
alertmanager-96d4c9b7f-xr7w7   1/1     Running   0          4m26s
gateway-54878fcb85-5qjzj       2/2     Running   0          4m19s
nats-784c98db98-gf7kz          1/1     Running   0          4m21s
prometheus-6b7b994d9d-49w4d    1/1     Running   0          4m21s
queue-worker-c5776978d-sccpq   1/1     Running   0          4m20s
======================================================================

3)接続先を確認する。
root@rasp-master:/home/pi/k8s/faas-netes# kubectl -n openfaas get svc
================================================================================
NAME           TYPE        CLUSTER-IP      EXTERNAL-IP   PORT(S)          AGE
alertmanager   ClusterIP   10.104.22.60    <none>        9093/TCP         5m1s
gateway        NodePort    10.108.216.33   <none>        8080:31112/TCP   4m54s
nats           ClusterIP   10.109.27.162   <none>        4222/TCP         4m53s
prometheus     NodePort    10.99.157.125   <none>        9090:31119/TCP   4m53s
================================================================================

4)以下のアドレスでアクセスを行う。
http://IPアドレス:31112/

5)ログインが出来たことが確認できた。


5)openfaasのコマンドを導入してみる。
root@rasp-master:/home/pi/k8s/faas-netes# curl -SL https://cli.openfaas.com/ | sudo sh
==========================================================================================
  % Total    % Received % Xferd  Average Speed   Time    Time     Time  Current
                                 Dload  Upload   Total   Spent    Left  Speed
100    23  100    23    0     0     23      0  0:00:01 --:--:--  0:00:01    23
100  3525  100  3525    0     0   2723      0  0:00:01  0:00:01 --:--:--  688k
armv7l
Downloading package https://github.com/openfaas/faas-cli/releases/download/0.8.14/faas-cli-armhf as /tmp/faas-cli-armhf
Download complete.

Running as root - Attempting to move faas-cli to /usr/local/bin
New version of faas-cli installed to /usr/local/bin
Creating alias 'faas' for 'faas-cli'.
  ___                   _____           ____
 / _ \ _ __   ___ _ __ |  ___|_ _  __ _/ ___|
| | | | '_ \ / _ \ '_ \| |_ / _` |/ _` \___ \
| |_| | |_) |  __/ | | |  _| (_| | (_| |___) |
 \___/| .__/ \___|_| |_|_|  \__,_|\__,_|____/
      |_|

CLI:
 commit:  25cada08609e00bed526790a6bdd19e49ca9aa63

 version: 0.8.14
=====================================================================================


と言うことで、色々と検証してみる。


2019年6月19日水曜日

dashboard for k8s(Raspberry Pi)

1)以下のコマンドで、arm用のyamlファイルの取得を行う。
curl https://raw.githubusercontent.com/kubernetes/dashboard/master/aio/deploy/recommended/kubernetes-dashboard.yaml | sed "s/amd64/arm/g" > kubernetes-dashboard.yaml

2)dashboardの作成を行う。
kubectl apply -f kubernetes-dashboard.yaml


3)サービスアカウントのyamlの作成を行う。
vi service-account.yaml
=============================================
apiVersion: v1
kind: ServiceAccount
metadata:
  name: admin-user
  namespace: kube-system
---
apiVersion: rbac.authorization.k8s.io/v1beta1
kind: ClusterRoleBinding
metadata:
  name: admin-user
roleRef:
  apiGroup: rbac.authorization.k8s.io
  kind: ClusterRole
  name: cluster-admin
subjects:
- kind: ServiceAccount
  name: admin-user
  namespace: kube-system                         
=============================================

4)アカウントの作成を行う。
kubectl apply -f service-account.yaml


5)トークンコードを調べるために、以下のユーザーIDを確認する。
kubectl -n kube-system get secret | grep admin-user
==============================================================
admin-user-token-lwf2g                           kubernetes.io/service-account-token   3      12m
================================================================


6)以下のコマンドで、トークンコードを表示させる。
kubectl -n kube-system describe secret admin-user-token-lwf2g 
======================================================================
Data
====
ca.crt:     1025 bytes
namespace:  11 bytes
token:   ******************  <———ログイン時に必要なので控えておく!
======================================================================


7)このままだと、ローカルIP経由のみのアクセスしか出来ないので、以下の変更を行う。
kubectl -n kube-system edit service kubernetes-dashboard
=====================================================================
apiVersion: v1
kind: Service
metadata:
  annotations:
    kubectl.kubernetes.io/last-applied-configuration: |
      {"apiVersion":"v1","kind":"Service","metadata":{"annotations":{},"labels":{"k8s-app":"kubernetes-dashboard"},"name":"kubernetes-dashboard","namespace":"kube-system"},"spec":{"ports":[{"port":443,"targetPort":8443}],"selector":{"k8s-app":"kubernetes-dashboard"}}}
  creationTimestamp: "2019-06-19T14:27:53Z"
  labels:
    k8s-app: kubernetes-dashboard
  name: kubernetes-dashboard
  namespace: kube-system
  resourceVersion: "925201"
  selfLink: /api/v1/namespaces/kube-system/services/kubernetes-dashboard
  uid: 6c7bf2cf-929e-11e9-ab4f-b827eb29cf3e
spec:
  clusterIP: 10.106.13.164
  externalTrafficPolicy: Cluster
  ports:
  - nodePort: 30193
    port: 443
    protocol: TCP
    targetPort: 8443
  selector:
    k8s-app: kubernetes-dashboard
  sessionAffinity: None
  type: NodePort   <————ローカルIP以外からもアクセス可能にするためにNodePortに変更。
status:
  loadBalancer: {}
==========================================================================


8)dashboardのポート番号を調べる。

root@rasp-master:~# kubectl -n kube-system get service kubernetes-dashboard
=====================================================================================
NAME                   TYPE       CLUSTER-IP      EXTERNAL-IP   PORT(S)         AGE
kubernetes-dashboard   NodePort   10.106.13.164   <none>        443:30193/TCP   23m
=====================================================================================

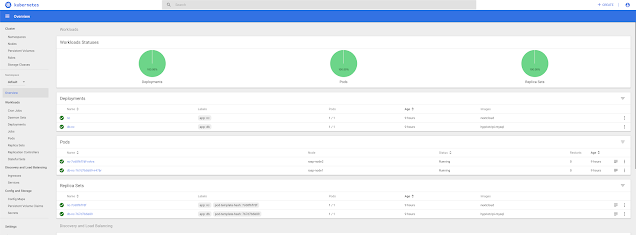
ブラウザで、以下の方法でアクセスを行う。

https://IPアドレス:ポート番号
docker コンテナに直接ログインする方法について。


1)以下のコマンドで、表示されている一覧から対象のログインしたいコンテナのイメージ名を探す。
docker ps -a


2)以下のコマンドで、コンテナに直接ログイン可能となる。
docker run -it "イメージ名" bash

root@rasp-master:/home/pi/k8s# docker run -it arm32v7/redmine bash


3)ログインができていることが確認できる。
root@3a867fa57f23:/usr/src/redmine# ls
==============================================================================
CONTRIBUTING.md  Gemfile.lock       Gemfile.lock.postgresql  Gemfile.lock.sqlserver  Rakefile  appveyor.yml  config   db   extra  lib  plugins  sqlite  tmp

Gemfile Gemfile.lock.mysql2  Gemfile.lock.sqlite3     README.rdoc       app bin       config.ru  doc  files  log  public   test    vendor
================================================================================

docker-compose for Raspberry pi


docker-composeを入れてredmineをお試しに導入してみる。

1) redminのマニフェストを作成する。
vi compose_redmain.yaml
============================================
version: '3.5'
services:
  redmine:
    image: arm32v7/redmine
    restart: always
    ports:
      - 8080:3000
    environment:
      REDMINE_DB_POSTGRES: db
      REDMINE_DB_DATABASE: redmine
      REDMINE_DB_USERNAME: redmine
      REDMINE_DB_PASSWORD: exsample
      REDMINE_DB_ENCODING: utf8
    depends_on:
      - db
    volumes:
      - /var/www/redmine/files:/usr/src/redmine/files
      - /var/www/redmine/log:/usr/src/redmine/log
      - /var/www/redmine/plugins:/usr/src/redmine/plugins
      - /var/www/redmine/public/themes:/usr/src/redmine/public/themes

  db:
    image: postgres
    restart: always
    environment:
      POSTGRES_DB: redmine
      POSTGRES_USER: redmine
      POSTGRES_PASSWORD: **********
===============================================


2)コンテナの生成を行ってみる。


docker-compose -f compose_redmain.yaml up -d
==========================================================
Creating network "k8s_default" with the default driver
Pulling db (postgres:)...
latest: Pulling from library/postgres
5155b41fe73a: Already exists
6aedcf4ebf8d: Pull complete
                 .
                 .
                 .
Creating k8s_db_1 ... done
Creating k8s_redmine_1 ... done
============================================================


3)無事、生成出来たようだ。

root@rasp-master:/home/pi/k8s# docker ps
======================================================================================
CONTAINER ID        IMAGE                  COMMAND                  CREATED             STATUS              PORTS                    NAMES
814544b3d3ea        arm32v7/redmine        "/docker-entrypoint.…"   52 seconds ago      Up 6 seconds        0.0.0.0:8080->3000/tcp   k8s_redmine_1
======================================================================================


2019年6月16日日曜日

terraform for Raspberry pi

[terraformの導入手順]

wget https://releases.hashicorp.com/terraform/0.12.2/terraform_0.12.2_linux_arm.zip
unzip terraform_0.12.2_linux_arm.zip
sudo mv terraform /usr/bin


◻️念のためバージョンの確認を行う。

root@rasp-master:~# terraform --version
Terraform v0.12.2

helm( kube-prometheus-stack)とlokiの連携

helm経由で、 kube-prometheus-stackとloki stackを入れるだけだと連携ができないので 追加で以下の手順を進める必要がある。 1)Loki stackの導入を実施 helm install loki grafana/loki-stack --name...