2021年8月31日火曜日

argoCD(GitHub:プライベートリポジトリからデプロイ)


1)old配下に、nginxのマニュフェストを作成する。


2)ArgoCDにて、Settings > Repositoriesを選択

3)対象のレポジトリを選択して、Create Applicationを選択


4)以下を入力する

■GENERAL

Application Name  : 適当な名前

Project                    : default


■SOURCE

Repository URL     :対象のレポジトリURL

Path                         : old(マニュフェストが置いてあるフォルダ)


■DESTINATION

Cluster URL             :デフォルトで用意れている物を選択

Name Space           :デプロイ対象のNameSpaceを指定


5)Createを押す


デプロイ後の様子。


PODが作成されることを確認(Lensの画面にて)


ArgoCD(github:プライベートリポジトリ追加方法)

公式:
https://argoproj.github.io/argo-cd/user-guide/private-repositories/#https-username-and-password-credential


1)Githubにて、アクセストークンを作成する。

公式(トークン作成方法)

https://docs.github.com/en/github/authenticating-to-github/keeping-your-account-and-data-secure/creating-a-personal-access-token


2)argoCDにアクセスして、CONNECT REPO USING HTTPSを選択。


3)以下、入力する。

Repository URL:対象のレポジトリ

UserName      :GituhubのUserName

Password     :上記で、作成したトークンをコピー&ペーストする。


2021年8月30日月曜日

argoCD(サンプルを使ってデプロイを行ってみる)

参照先:
https://www.yukkuriikouze.com/2020/10/26/4026/
今回、上記サンプルのレポジトリを指定

1)NEW APPを選択


2)以下、入力を行う。

Application Name : 任意

Project                   : default


■Source

Repository URL:

https://github.com/argoproj/argocd-example-apps.git

Path:

guestbook


■DESTINATION

cluster URL:

https://kubernets.default.svc

Namespace:

default


上記、入力が出来たら、CREATEを押す。


上記のサンプルでは成功

(Lensの画面にて)


argoCDの管理画面にて、状況確認

(デプロイ成功の様子)


実際に、アクセスしてみる。

(上記でデプロイした、ArgoCDのサンプルアプリ)


2021年8月28日土曜日

argoCD for Raspberry pi

公式:

https://argoproj.github.io/argo-cd/getting_started/


前提条件:

導入前にqemu5.2を導入している。


手順:

1)デプロイを行う。

kubectl create namespace argocd

kubectl apply -n argocd -f https://raw.githubusercontent.com/argoproj/argo-cd/stable/manifests/install.yaml


2)外部からのアクセスを行うためにLBを設置する。

kubectl patch svc argocd-server -n argocd -p '{"spec": {"type": "LoadBalancer"}}'


3)パスワードの表示を行う

kubectl -n argocd get secret argocd-initial-admin-secret -o jsonpath="{.data.password}" | base64 -d


無事、ログインも出来たようだ。


注意:
上記、カーネルを64bitに変更してargoCDのデプロイを行うと、qemuにて、以下のエラーが出てハマった。

qemu: uncaught target signal 11 (Segmentation fault) 

Lens(クラスター追加:Raspberry pi)

 現状の構成:
master(raspberry pi) x1台
worker(raspberry pi) x2台


1)master側のraspberryにログインする

2)以下を開き、表示されている内容をコピーする。

~/.kube/config


3)以下、コピーする。


4)Lensに立ち上げる

5)File > Add Clusterを選択


6)上記で、コピーした内容をペーストする。

7)Add clusterボタンを押す


以下のように表示されている


qemu5.2 for Raspberry pi

ソースコード:https://github.com/penM000/qemu-binfmt-setup/blob/main/qemu-binfmt-setup.sh#L2

qemu:

Intel cpuのエミュレータ


1)以下、shellを実行するだけ。

 ./qemu-binfmt-setup.sh 


2)以下のコマンドで導入を確認してみる。

qemu-x86_64-static --version


カーネル変更(32bit ->64bit) for Raspberry pi4

現在、32bitのカーネルなので64bitに変更を行う。

armv71と表示されているので32bitになる。


uname -a


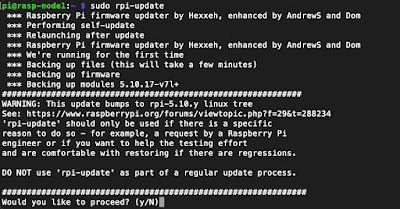
1)ファームのアップデートを行う。

sudo rpi-update


2)config.txtの編集

sudo vi /boot/config.txt


3)以下を末端に追記

arm_64bit=1


4)再起動を行う。

5)再起動後、64bitを確認する。


2021年8月24日火曜日

Lens(certificate系エラーの件)

 1)istioのインストールを行うとcert系のエラーが出る。


内容:

failed to update resource with server-side apply for obj EnvoyFilter/istio-system/tcp-stats-filter-1.10: Internal error occurred: failed calling webhook "validation.istio.io": Post "https://istiod.istio-system.svc:443/validate?timeout=10s": x509: certificate signed by unknown authority (possibly because of "crypto/rsa: verification error" while trying to verify candidate authority certificate "cluster.local")


対処:

切り分けとして、個人で、作成したnamespaceなどの削除を行って

再度、istioの導入を行っても改善できないことがわかった。

シンプルに、docker desktopの初期化して、新規導入したらエラーは出なくなった。

Grafana (ダッシュボードのexport)

 1)以下の赤枠の箇所を押す。


2)Exportタブを選択

3)Save to fileを押すことによりファイル出力が行える(json形式)


インポート:

以下の方法により、上記出力したダッシュボードのファイルをインポートできる。


Grafanaクエリ

以下は、Grafanaのダッシュボード作成時に活用したいクエリ類になる。


参照先:

https://medium.com/orangesys/a-deep-dive-into-kubernetes-metrics-part-3-7333fae67403


1)各種コンテナのCPU使用率クエリ

sum(rate(container_cpu_usage_seconds_total[1m])) by (pod) * 30


2)CPUリミットを実装しているとき、サーチュレーションを求めるクエリ

sum(rate(container_cpu_cfs_throttled_seconds_total[1m])) by (container_name)


3)コンテナメモリーユーティライゼーションのクエリ

sum(container_memory_working_set_bytes{name!~"POD"})  by (name)


4)コンテナメモリーサーチュレーションは、メモリーリミットが実行中のクエリ

sum(container_memory_working_set_bytes) by (namespace) / sum(label_join(kube_pod_container_resource_limits_memory_bytes, "container_name", "", "container")) by (namespace)


ネットワークのためのサーチュレーションは最大のネットワークのバンド幅がどれくらいになるのかわかっておらず、とても不明確なものです。

ドロップされたパケットをプロキシとして使用することも可能です。


1)container_network_receive_packets_dropped_total

2)container_network_transmit_packets_dropped_total

3)container_network_receive_errors_total

4)container_network_transmit_errors_total


2021年8月18日水曜日

Gremlin(CPU負荷テスト)

検証環境:
Mac(Docker desktop)
CPU: core x4個
対象 ->wordpressのコンテナ


1)以下の設定値でテストを行ってみる


CPU Capacity   : 60%

Cores(CPUコア): 1


2)以下のように、gremlin自体のCPU使用率が60%だが、全体のCPUは4コアで

wordpressのコンテナを稼働しているので、全体のCPU使用率は19%であることが把握できる。


メモ:

当たり前の話だが、CPU負荷テストを、対象のコンテナに行った場合

対象のデータプレイン(コンテナが稼働しているノードを指す)のコンテナも同様にCPU負荷が高くなる。


EFS(Dockerfile)の記載について注意

  Dockerfileにefsのマウントパス宛に、ファイルコピーを行うと ECSのサービス作成時に、コンテナのデプロイ失敗に(container run time error)になるので 別経由で、EFSにファイルをコピーした方が良い!! <Dockerfile> ...