公式:
https://aws.amazon.com/jp/premiumsupport/knowledge-center/eks-worker-node-actions/
1)以下のコマンドでノードの台数を増やす。
eksctl scale nodegroup --cluster "クラスター名" --nodes=3 --nodes-min 1 --nodes-max 3 --name "グループ名"
公式:
https://aws.amazon.com/jp/premiumsupport/knowledge-center/eks-worker-node-actions/
1)以下のコマンドでノードの台数を増やす。
eksctl scale nodegroup --cluster "クラスター名" --nodes=3 --nodes-min 1 --nodes-max 3 --name "グループ名"
ノードを1台のみでnginxのマニュフェストをデプロイを行うと以下のメッセージが出る。

解決策:
ノードの台数を増やす。
eksctl scale nodegroup --cluster my-cluster --nodes=3 --nodes-min 1 --nodes-max 3 --name ng-ab92a61e
EKSのマネージメントコンソール上でも確認

無事、稼働を確認。
参照:
https://docs.aws.amazon.com/ja_jp/eks/latest/userguide/update-managed-node-group.html
クラスターの更新:
1)1.20 ->1.21に更新を行う。

2)以下のコマンドで実施する。
eksctl upgrade cluster --name my-cluster --approve

バージョンアップを確認

上記と同様にバージョンアップを確認

ノードグループの更新:
1)上記と同様に、1.20 ->1.21に更新を行う。

2)以下のコマンドで更新を実施する。
eksctl upgrade nodegroup --name=ノードグループ名 --cluster=my-cluster --kubernetes-version=1.21
3)マネージメントコンソール上で、バージョンアップされていることを確認

以下、プライベートサブネット及びパブリックサブネットで
EKSのAPIを利用する場合について考察してみる。
①プライベートサブネットパターン
EKSのAPIを外部公開するのを避けたい場合。
デプロイする場合:
踏み台のEC2を用意してEKS用の環境にする必要がある。
->初回の設定時にEC2でのデプロイが必要になるが、CI/CD経由でデプロイを行う場合は
踏み台(EC2)を使うことは減る傾向にある。

②パブリックサブネット
EKSのAPIを外部公開しても問題ない場合。
デプロイする場合:
ローカル上からNATゲートウェイ経由で、EKSにデプロイしたい場合にデプロイが可能。
->初回の設定時にEC2でのデプロイが必要になるが、CI/CD経由でデプロイを行う場合は
ローカル経由で使うことは減る傾向にある。

参照:
クラスタ作成(EC2)
https://docs.aws.amazon.com/ja_jp/eks/latest/userguide/getting-started-eksctl.html
ノード作成(マネージド型)
https://docs.aws.amazon.com/ja_jp/eks/latest/userguide/launch-workers.html
■クラスター&ノードの作成
1)以下のコマンドでクラスタの作成とノードの作成を行う。
(EC2インスタンスの指定がないと、台数が2台でm5.largeで作成される)
========================
eksctl create cluster \
--name クラスタ名 \
--region ap-northeast-1 \
--node-type t2.micro \
--nodes 1 \
--nodes-min 1 \
--nodes-max 1 \
--with-oidc \
--ssh-access \
--ssh-public-key パブリックキー名 \
--managed
=======================

完成の様子:

EC2のマネージメントコンソール上でも確認:

EKSのマネージメントコンソールで確認:
(ノードが作成されていることが確認できる)

簡単な、マニュフェストを作成して確認を行う:

■ノードの追加作成
前提:
クラスターの作成を行っていること。
1)以下のコマンドで実施を行う。
===============
eksctl create nodegroup \
--cluster クラスタ名 \
--region ap-northeast-1 \
--name ec2-cluster1 \
--node-type t2.micro \
--nodes 1 \
--nodes-min 1 \
--nodes-max 1 \
--ssh-access \
--ssh-public-key パブリックキー名 \
--managed
=================

1)既存のノードが Fargate ポッドと通信できるようにする
aws eks describe-cluster --name my-cluster --query cluster.resourcesVpcConfig.clusterSecurityGroupId
2)Fargate ポッド実行ロールを作成する
1)AWS Management Console を使用して AWS Fargate ポッド実行ロールを作成する
①IAM -> ロールの作成を選択。
②EKS > EKS -Fargate podを選択する。

2)次のステップ:タグ

3)次のステップ:確認(今回は、タグの入力なし)

4)ロール名を入力 > ロールの作成

5)Fargateのプロファイルの作成を行う
==========================
eksctl create fargateprofile \
--cluster my-cluster \
--name fargate_profile_my-cluster \
--namespace k8s-fargate
===========================

6)プロファイルが作成されていることが確認できる

■ログの記録
1)ログルータの作成を行う
aws-observability-namespace.yaml
=============================
kind: Namespace
apiVersion: v1
metadata:
name: k8s-fargate(自作のnamespace)
labels:
aws-observability: enabled
=============================
2)Cloudwatch用のマニュフェストを作成する
==============================
kind: ConfigMap
apiVersion: v1
metadata:
name: aws-logging
namespace: k8s-fargate
labels:
data:
output.conf: |
[OUTPUT]
Name cloudwatch_logs
Match *
region ap-northeast-1
log_group_name fluent-bit-cloudwatch
log_stream_prefix from-fluent-bit-
auto_create_group true
parsers.conf: |
[PARSER]
Name crio
Format Regex
Regex ^(?<time>[^ ]+) (?<stream>stdout|stderr) (?<logtag>P|F) (?<log>.*)$
Time_Key time
Time_Format %Y-%m-%dT%H:%M:%S.%L%z
filters.conf: |
[FILTER]
Name parser
Match *
Key_name log
Parser crio
Reserve_Data On
Preserve_Key On
==================================
3)デプロイする
kubectl apply -f aws-logging-cloudwatch-configmap.yaml
4)CLoudwatchのポリシーローカルにダウンロード
curl -o permissions.json https://raw.githubusercontent.com/aws-samples/amazon-eks-fluent-logging-examples/mainline/examples/fargate/cloudwatchlogs/permissions.json
5)上記でダウンロードしたポリシー ファイルを使用して、IAM ポリシーを作成します
aws iam create-policy --policy-name eks-fargate-logging-policy --policy-document file://permissions.json

6)IAM ポリシーを、Fargate プロファイルに指定されたポッド実行ロールにアタッチします
===================
aws iam attach-role-policy \
--policy-arn arn:aws:iam::●●●●●●●●●●:policy/eks-fargate-logging-policy \
--role-name AmazonEKSFargatePodExecutionRole
====================
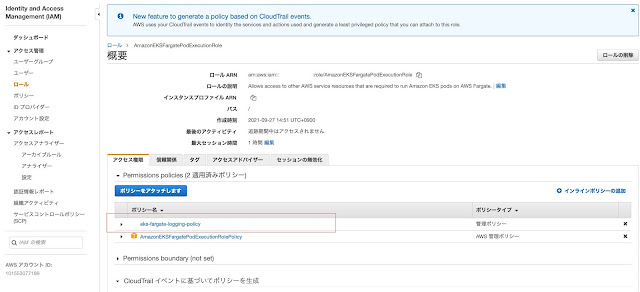
6)追加した”eks-fargate-logging-policy”が追加されていることが把握できる。
メモ:
Cloudwatch上にログが出てないようにみえる
■マニュフェスト作成&実施
1)簡単にnginxのマニフェストを作成
========================
apiVersion: apps/v1
kind: Deployment
metadata:
name: sample-app
namespace: k8s-fargate
spec:
replicas: 3
selector:
matchLabels:
app: nginx
template:
metadata:
labels:
app: nginx
spec:
containers:
- name: nginx
image: nginx:latest
ports:
- name: http
containerPort: 80
==========================
デプロイを行ってなってみる
kubectl apply -f nginx.yaml

1)IAMロール、ポリシーを作成する。
cluster-autoscaler-policy.json
======================================
{
"Version": "2012-10-17",
"Statement": [
{
"Action": [
"autoscaling:DescribeAutoScalingGroups",
"autoscaling:DescribeAutoScalingInstances",
"autoscaling:DescribeLaunchConfigurations",
"autoscaling:DescribeTags",
"autoscaling:SetDesiredCapacity",
"autoscaling:TerminateInstanceInAutoScalingGroup",
"ec2:DescribeLaunchTemplateVersions"
],
"Resource": "*",
"Effect": "Allow"
}
]
}
====================================
2)ポリシーの作成を行う。
=======================================
aws iam create-policy \
--policy-name AmazonEKSClusterAutoscalerPolicy \
--policy-document file://cluster-autoscaler-policy.json
=========================================
以下、実行結果

IAMでも確認
(AmazonEKSClusterAutoscalerPolicy が追加されてますね。)

■Cluster Auto Scaling をデプロイする
1)以下、マニュフェストを実施する。
kubectl apply -f https://raw.githubusercontent.com/kubernetes/autoscaler/master/cluster-autoscaler/cloudprovider/aws/examples/cluster-autoscaler-autodiscover.yaml

2)上記で作成したIAMロールにアタッチする。
kubectl annotate serviceaccount cluster-autoscaler \
-n kube-system \

3)cluster-autoscaler.kubernetes.io/safe-to-evict のアノテーションを Cluster Autoscaler ポッドに
追加するうように、デプロイにパッチを適用
kubectl patch deployment cluster-autoscaler \
-n kube-system \
-p '{"spec":{"template":{"metadata":{"annotations":{"cluster-autoscaler.kubernetes.io/safe-to-evict": "false"}}}}}'
4)Cluster Autoscaler デプロイを編集する
kubectl -n kube-system edit deployment.apps/cluster-autoscaler
編集前:

編集後:

3)cluster-autoscalerの設定を行う。
kubectl set image deployment cluster-autoscaler \
-n kube-system \
cluster-autoscaler=k8s.gcr.io/autoscaling/cluster-autoscaler:v1.21.2

4)ログで確認を行う。
kubectl -n kube-system logs -f deployment.apps/cluster-autoscaler
以下のMacStudio2台に、EXOを使ってクラスタリングを行います。 ①MacStudio(M1 MAX 32GB) ②MacStudio(M4 MAX 36GB) 1)導入方法は、以下を参照。 参照先: https://github.com/exo-explore/exo/...

